
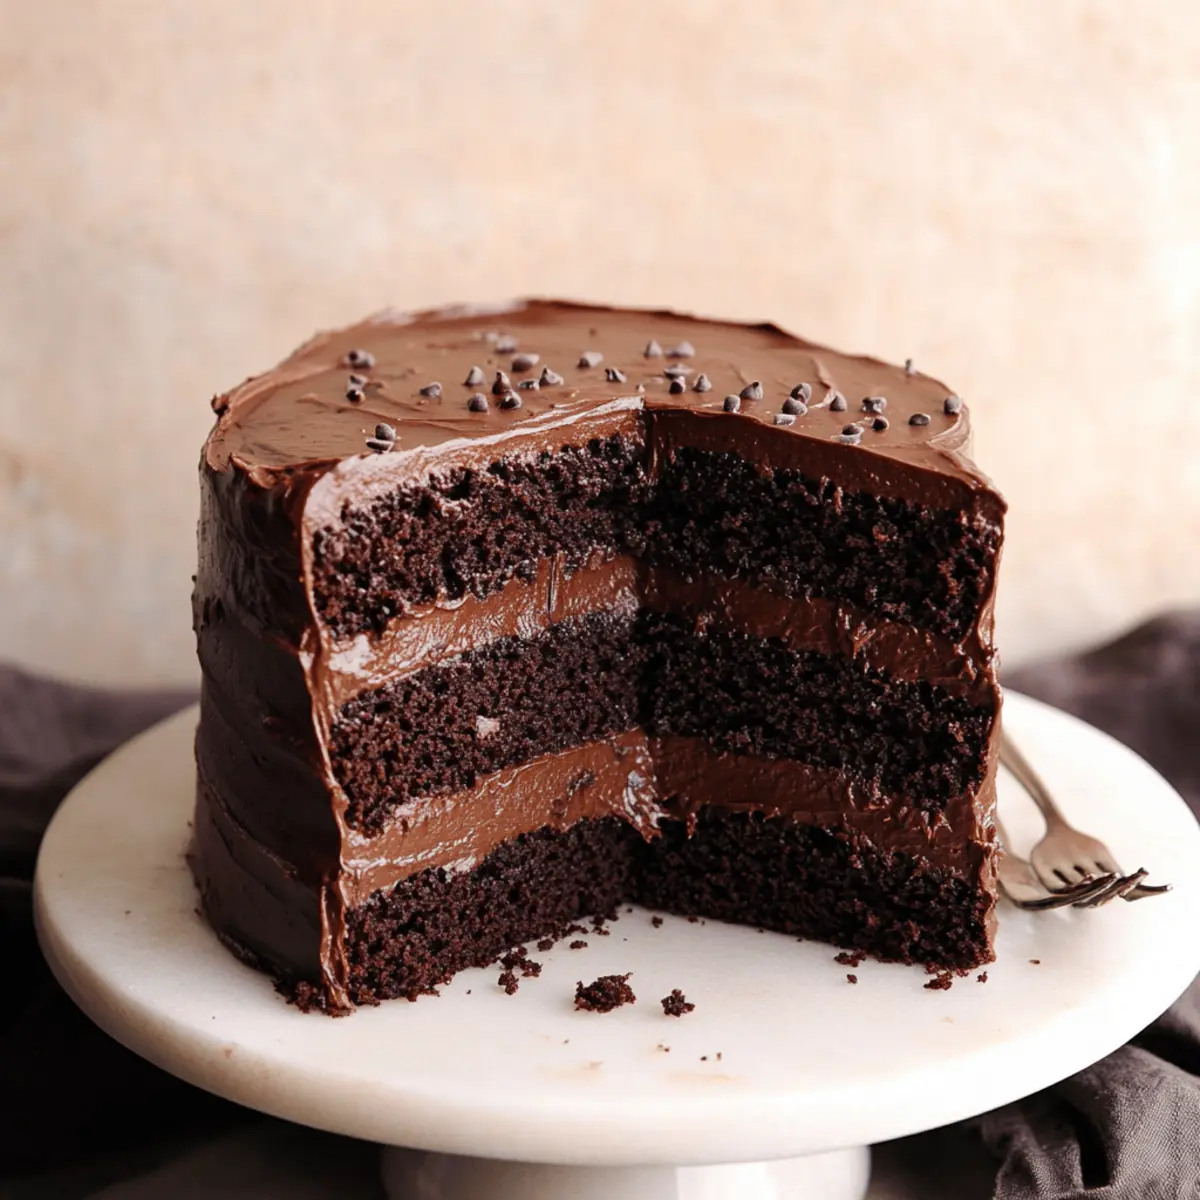

The Best Matilda Chocolate Cake is like a hug in dessert form. Imagine sinking your fork into layers of rich, moist chocolate cake, each bite melting decadently in your mouth. The aroma of freshly baked chocolate wafts through the air, enchanting anyone within sniffing distance. This cake isn’t just a treat; it brings people together, whether it’s at a birthday party, a cozy family gathering, or simply a night in with a good book and a cup of coffee.
Picture this: the first bite sends your taste buds on a whirlwind adventure, as the creamy frosting pairs perfectly with the indulgent cake layers. It has the kind of flavor that creates instant nostalgia, reminding you of what cake should truly taste like. So, grab your apron and let’s dive into making The Best Matilda Chocolate Cake that will leave your family and friends begging for seconds.
Why You'll Love This The Best Matilda Chocolate Cake
- This incredible The Best Matilda Chocolate Cake transforms simple everyday ingredients into restaurant-quality flavors that will blow your mind completely.
- Foolproof recipe techniques guarantee perfect results every single time, making even novice cooks feel like professional chefs instantly.
- Stunning visual appeal with gorgeous colors and mouthwatering aromas creates the ultimate Instagram-worthy dish for any special occasion.
- Endlessly adaptable for different dietary needs while working beautifully for meal prep, date nights, or entertaining large groups effortlessly.
Ingredients for The Best Matilda Chocolate Cake
Here’s what you’ll need to make this delicious The Best Matilda Chocolate Cake:
2 cups all-purpose flour (260g) – Make sure to sift it for a lighter, fluffier cake.
1.5 tsp baking powder – This helps the cake rise beautifully.
1.5 tsp baking soda – Ensures your cake is perfectly fluffy and light.
1 cup granulated sugar (200g) – The sweetener that balances the rich chocolate flavor.
⅔ cup light brown sugar (135g) – Adds moisture and a slight caramel note.
1 tsp salt – Enhances all the flavors in the cake.
3 large eggs – Room temperature eggs whip up fluffier.
⅔ cup vegetable oil (133g) – Keeps the cake moist without making it greasy.
⅓ cup buttermilk – A mix of milk and vinegar that adds tenderness.
1 cup sour cream (240g) – Provides richness and extra moisture.
¾ cup cocoa powder (75g) – Dutch processed cocoa gives a deep, chocolatey flavor.
2 tsp instant coffee – Enhances the chocolate flavor without tasting like coffee.
¾ cup boiling water (180g) – Brings out the extra depth in the cocoa.
300g dark chocolate – The real star in the frosting; use good quality for the best taste.
3 tbsp corn syrup – Adds shine and a slight chewiness to the frosting.
8 oz cream cheese (226g) – This gives the frosting a tangy richness.
⅓ cup cocoa powder (33g) – For the frosting, adds that delicious chocolate flavor.
1 cup powdered sugar (100g) – Sweetens the frosting perfectly.
¼ tsp salt – Balances the sweetness in the frosting.
1 ¼ cup heavy cream, chilled – Whips up fantastically to give the frosting its light texture.
How to Make The Best Matilda Chocolate Cake
Follow these simple steps to prepare this delicious The Best Matilda Chocolate Cake:
Step 1: Preheat the Oven
Preheat your oven to 350°F (no fan) and prepare three 8-inch cake pans by greasing them with butter and lining them with parchment paper.
Step 2: Combine Dry Ingredients
In a large bowl, whisk together the all-purpose flour, baking powder, baking soda, granulated sugar, light brown sugar, and salt. Continue whisking until the mixture is completely smooth and lump-free.
Step 3: Mix Wet Ingredients
In a separate bowl, combine the room temperature eggs, vegetable oil, buttermilk, and sour cream. Whisk until you achieve a smooth mixture.
Step 4: Combine Wet and Dry Mixtures
Gradually add the dry ingredients into the wet mix in two additions. Gently whisk and fold until just combined. Be careful not to overmix—your cake’s fluffiness depends on it.
Step 5: Prepare Cocoa Mixture
In a small bowl, mix the cocoa powder and instant coffee. Carefully pour boiling water over this mixture and whisk until it turns into a shiny, smooth substance.
Step 6: Create Chocolate Cake Batter
Add the cocoa mixture to the cake batter and gently fold until a rich, chocolate batter forms. Then, divide this decadent batter evenly among the prepared cake pans.
Step 7: Bake the Cakes
Bake for about 22-24 minutes. Check for doneness by inserting a toothpick; it should come out with light, moist crumbs.
Step 8: Cool the Cakes
Let the cakes cool in the pans for 20 minutes. Then, carefully transfer them to a wire rack to cool completely, which could take about an hour.
Step 9: Prepare the Frosting
In a small saucepan, combine the dark chocolate and corn syrup, heating them over low heat until melted, stirring consistently. Remove from heat and set aside.
Step 10: Make the Cream Cheese Frosting
In a stand mixer, beat the room temperature cream cheese along with sifted cocoa powder, powdered sugar, and salt on medium speed until creamy. Then, slowly add the chilled heavy cream and whip until it reaches a fluffy texture.
Step 11: Combine the Frosting
While mixing on low speed, pour in the melted chocolate mixture and whisk until everything is perfectly combined. Allow it to cool until it’s just spreadable.
Step 12: Assemble the Cake
Once the cakes and the frosting have cooled, trim the domes off the cakes. Layer them with a thick spread of frosting, then apply a crumb coat and refrigerate for 20 minutes. Finish with a generous slather of frosting all over.
Step 13: Serve and Enjoy
Slice up your masterpiece and serve! This cake tastes best at room temperature, so let it sit for a bit before indulging.
Now that you know how to whip up The Best Matilda Chocolate Cake, be ready for compliments and requests for seconds—there’s just something in those layers that keeps people coming back for more. Happy baking!

This showstopping The Best Matilda Chocolate Cake delivers restaurant-quality results using simple ingredients you probably already have at home. The perfect balance of textures and flavors creates an unforgettable dining experience that will have everyone asking for seconds. Picture-perfect presentation with vibrant colors makes this dish absolutely Instagram-worthy and guaranteed to impress any dinner guest. Incredibly versatile recipe that works beautifully for weeknight dinners, meal prep, special occasions, or even outdoor entertaining sessions.
Perfecting The Best Matilda Chocolate Cake Cooking Process
Start by preheating your oven and preparing the cake pans, allowing them to cool while mixing your dry ingredients. As the batter forms, prepare your frosting by melting the chocolate. Once both elements are cooked and cooled, it’s time for assembly!
Add Your Touch to The Best Matilda Chocolate Cake
Feel free to customize this cake by swapping all-purpose flour for gluten-free options or adding a splash of vanilla extract for extra flavor. You can also toss in chocolate chips or a swirl of fruit preserves for a delightful surprise.
Storing & Reheating The Best Matilda Chocolate Cake
To keep your cake fresh, wrap it tightly in plastic wrap or store it in an airtight container at room temperature. For an optimal taste experience, enjoy it at room temperature; reheating isn’t necessary.
Chef's Helpful Tips for The Best Matilda Chocolate Cake
- This professional-quality The Best Matilda Chocolate Cake relies on precise timing and temperature control to achieve restaurant-standard results consistently.
- Master the art of mise en place by prepping all ingredients beforehand, ensuring smooth execution and preventing any last-minute cooking disasters.
- The secret lies in layering flavors throughout the cooking process rather than seasoning only at the end for maximum depth.
- Pro tip: let the finished dish rest for optimal texture and flavor development before serving to hungry guests waiting eagerly.
Sometimes, I bake this cake to cheer up friends, and their smiles after the first bite speak volumes! It’s truly a favorite that brings everyone together.

FAQs About The Best Matilda Chocolate Cake
What is The Best Matilda Chocolate Cake?
The Best Matilda Chocolate Cake is a rich, moist, and decadent dessert that combines layers of chocolate cake with a creamy chocolate frosting. Inspired by the beloved children’s movie “Matilda,” this cake is perfect for chocolate lovers. With its fluffy texture and deep chocolate flavor, it serves as the ideal treat for birthdays, celebrations, or simply when you need a delicious pick-me-up. This recipe calls for simple ingredients like flour, cocoa powder, and cream cheese, making it accessible for both novice and experienced bakers.
Can I customize The Best Matilda Chocolate Cake?
Absolutely! One of the best features of The Best Matilda Chocolate Cake is its versatility. You can easily swap all-purpose flour for gluten-free flour if needed. Feel free to include chocolate chips for extra gooeyness or a splash of vanilla extract to elevate the flavor. You can even incorporate a layer of fruit preserves for an unexpected twist. The options are endless, so get creative and make it your own!
How should I store The Best Matilda Chocolate Cake?
To keep your cake fresh, wrap it tightly in plastic wrap or store it in an airtight container at room temperature. This method helps maintain its moistness for several days. If you don’t finish it within a week, you can also refrigerate it to extend its shelf life. However, for the best taste experience, serve and enjoy The Best Matilda Chocolate Cake at room temperature, as it allows all the flavors to shine.
How long can I keep The Best Matilda Chocolate Cake?
The Best Matilda Chocolate Cake can last up to a week at room temperature when stored properly in an airtight container. If refrigerated, it might last a little longer, but keep in mind that refrigeration can slightly alter its texture. To fully enjoy its rich flavor and amazing texture, let the cake come to room temperature before serving. Every slice is a delightful reminder of why this cake is a cherished favorite among chocolate enthusiasts!
Conclusion for The Best Matilda Chocolate Cake
In summary, The Best Matilda Chocolate Cake is a showstopper that promises to impress anyone lucky enough to have a slice. With its simple ingredients, customizable options, and deliciously rich flavor, it’s not only perfect for special occasions but also for everyday enjoyment. Remember to pair this fantastic dessert with your favorite beverage, and prepare for the smiles that will come with each scrumptious bite. Don’t hesitate to whip up this cake and share it with friends and family; it’s genuinely a recipe to savor!
The Best Matilda Chocolate Cake
The Best Matilda Chocolate Cake is a rich, decadent dessert perfect for any chocolate lover.
- Oven
- mixing bowls
- whisk
- Stand mixer
- Cake Pans
- parchment paper
- Wire rack
- Saucepan
- Serrated Knife
Dry Ingredients
- 2 cups all purpose flour (sifted)
- 1.5 tsp baking powder
- 1.5 tsp baking soda
- 1 cup granulated sugar
- ⅔ cup light brown sugar
- 1 tsp salt
- ¾ cup cocoa powder (Dutch Processed preferred)
- 2 tsp instant coffee
Wet Ingredients
- 3 large eggs (ideally room temp)
- ⅔ cup vegetable oil
- ⅓ cup buttermilk (mix ⅓ cup whole milk + 1 teaspoon vinegar)
- 1 cup sour cream (ideally room temp)
- ¾ cup boiling water
- 300 g dark chocolate
- 3 tbsp corn syrup
Frosting Components
- 8 oz cream cheese (room temperature)
- ⅓ cup cocoa powder
- 1 cup powdered sugar
- ¼ tsp salt
- 1 ¼ cup heavy cream (chilled)
Making the Cake
- Preheat oven to 350F (no fan) and prepare 3 8″ pans with parchment paper and butter.
- In a bowl, combine the flour, baking powder, baking soda, granulated sugar, light brown sugar and salt. Whisk together until no lumps remain.
- In a separate bowl, whisk together the eggs, vegetable oil, buttermilk and sour cream until smooth.
- Add the dry ingredients to the wet in 2 additions, and gently whisk and fold until just combined and no big lumps remain. Do not overmix.
- In a separate small bowl, add cocoa powder and instant coffee. Pour over boiling water and whisk until a smooth shiny mixture forms.
- Pour the cocoa mixture onto the remaining batter, and gently fold until a chocolate cake batter forms.
- Divide the batter evenly between the 3 prepared cake pans.
- Bake for ~22-24 minutes until a toothpick inserted in the center comes out with light moist crumbs attached.
- Let the cakes cool in the pans for 20 minutes, then carefully remove them and place on a wire rack. Let cool completely (refrigerate for 1 hour).
Making the Frosting
- For the frosting, add chocolate and corn syrup to a saucepan and heat over the lowest flame while stirring constantly until the chocolate has fully melted. Set aside.
- In the bowl of a stand mixer, add room temperature cream cheese and sift in cocoa powder, powdered sugar and salt. Use the paddle attachment and whisk on medium speed until creamy (1-2 minutes). Scrape the bowl.
- Add heavy cream and whisk again on low speed until fluffy. Scrape the bowl in the middle.
- Pour in the melted chocolate while whisking on low speed until fully combined into the frosting.
- Let the frosting cool until spreadable (at room temperature for ~30 minutes or in the fridge).
Assembling the Cake
- Once the cakes and frosting have cooled, use a large serrated knife to carefully trim off the domes from the cakes.
- Layer the cakes on top of each other with a generous layer of frosting in between. Cover the cake with a thin layer of frosting (crumb coat) and refrigerate for 20 minutes.
- Slather on remaining frosting all over.
- Serve & enjoy! Cake is best eaten at room temperature.
This cake brings smiles and joy to every occasion it graces. Customize with your favorite touches for extra delight.


Leave a Comment