
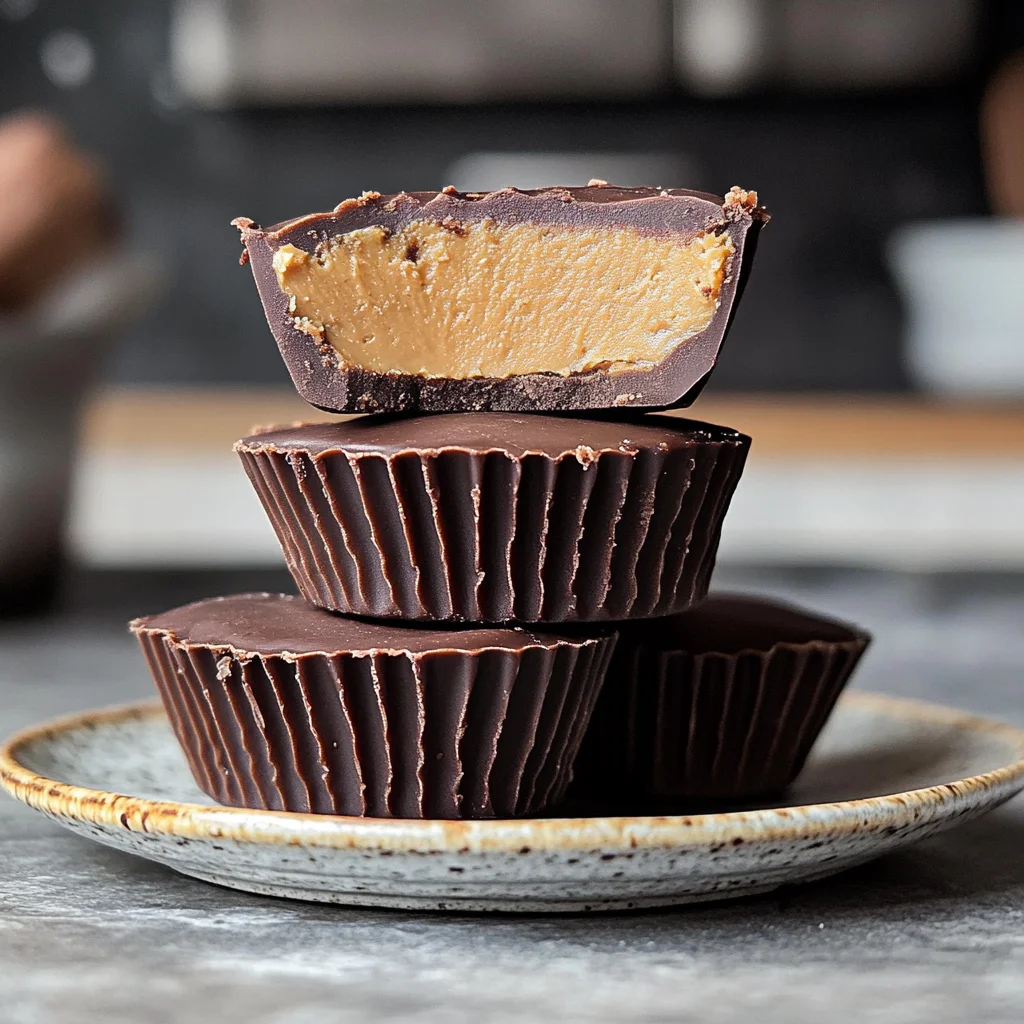

Imagine sinking your teeth into a velvety layer of rich chocolate that instantly melts in your mouth, revealing a creamy, dreamy peanut butter center that’s both sweet and slightly salty. Homemade peanut butter cups are the ultimate indulgence, evoking childhood memories of sneaking candy from the pantry while basking in the blissful aroma of melted chocolate wafting through the kitchen.
Picture this: it’s a rainy afternoon, and you’re cozied up with friends, sharing laughter and stories as you indulge in these delectable treats. Each bite is a taste of nostalgia, reminding you of simple pleasures and sweet moments. Whether it’s a movie night or a casual get-together, homemade peanut butter cups bring joy to any occasion, promising an unforgettable flavor experience that will have everyone coming back for more.
Why Is Homemade Peanut Butter Cups So Irresistibly Good?
First, these delicious treats combine rich dark chocolate and creamy peanut butter for a flavor explosion that’s hard to resist!
Second, they’re incredibly easy to whip up, taking just 15 minutes of prep time.
Third, you can customize the sweetness by adjusting the powdered sugar to suit your taste!
Finally, they’re a guaranteed crowd pleaser, perfect for parties or a late-night snack!
Homemade Peanut Butter Cups Ingredients
- For the Chocolate Layer
- 1 cup dark chocolate chips (or semi-sweet chocolate chips) – Use high-quality chocolate for a rich and smooth coating that complements the peanut butter filling perfectly.
- For the Peanut Butter Filling
- 1/2 cup creamy peanut butter – Choose your favorite brand for a deliciously smooth texture that melts in your mouth.
- 1/4 cup powdered sugar (adjust to taste) – Sweeten the filling to your liking; this adds just the right amount of sweetness to balance the chocolate.
- 1/2 teaspoon vanilla extract – A splash of vanilla enhances the overall flavor, making these Homemade Peanut Butter Cups even more irresistible.
How to Make Homemade Peanut Butter Cups
1. Melt the dark chocolate chips in a microwave-safe bowl in 30-second intervals, stirring in between until smooth and glossy. This should take about 1–2 minutes depending on your microwave.
2. Spoon a small amount of melted chocolate into the bottom of each muffin tin cup, spreading it gently to cover the bottom entirely. Aim for a thin layer, about 1/8 inch thick.
Make Peanut Butter Filling:
3. Combine in a mixing bowl the creamy peanut butter, powdered sugar (adjust to taste), and vanilla extract. Mix until everything is well blended and creamy, creating a luscious filling.
4. Spoon the peanut butter mixture on top of the chocolate layer in each muffin cup, filling them about halfway. The contrast of colors will be delightful!
Top with Chocolate:
5. Pour the remaining melted chocolate over the peanut butter filling, ensuring it is fully covered for that irresistible chocolatey finish. This keeps your treats perfectly sealed.
6. Refrigerate for at least 1 hour or until set completely, allowing all those flavors to meld beautifully together while firming up nicely.
7. Remove the peanut butter cups from the muffin tin once they are set and serve chilled for an extra refreshing treat!
Optional: Drizzle melted chocolate on top for an elegant finish.
Exact quantities are listed in the recipe card below.
Expert Tips
- Chocolate Quality: Always use high-quality chocolate chips for a rich flavor in your Homemade Peanut Butter Cups. Dark chocolate offers a great balance of sweetness.
- Melting Technique: Melt chocolate in 30-second intervals to prevent scorching. Stir thoroughly between intervals for a smooth consistency.
- Peanut Butter Consistency: Use creamy peanut butter for a smooth filling. If using natural peanut butter, ensure it’s well-stirred to avoid separation.
- Sugar Adjustment: Taste your peanut butter filling before adding all the powdered sugar. Adjust based on your sweetness preference for the perfect balance.
- Chilling Time: Don’t rush refrigeration! Allow at least an hour for the cups to fully set, ensuring a clean and easy removal from the muffin tin.
How to Store and Freeze Homemade Peanut Butter Cups

- Room Temperature: Keep your Homemade Peanut Butter Cups in an airtight container for up to 3 days. Avoid direct sunlight to maintain their deliciousness.
- Fridge: For longer freshness, store them in the fridge for up to 1 week. Place them in an airtight container to prevent moisture and maintain the chocolate’s texture.
- Freezer: Freeze your Homemade Peanut Butter Cups for up to 3 months. Wrap each cup tightly in plastic wrap and then place them in a freezer-safe bag for best results.
- Thawing: When you’re ready to indulge, simply take them out of the freezer and let them sit at room temperature for about 15 minutes before enjoying!
Make Homemade Peanut Butter Cups Your Own
Feel free to get creative and personalize these delightful treats to match your taste buds!
- Milk Chocolate: Swap dark chocolate chips for milk chocolate for a sweeter, creamier version that melts in your mouth. The familiar taste brings back childhood memories with every bite.
- Nutty Twist: Add chopped nuts like almonds or hazelnuts into the peanut butter filling for an extra crunch and flavor. This unexpected addition creates a delightful texture contrast that elevates each cup.
- Spicy Kick: Mix in a pinch of cayenne pepper to the peanut butter filling for a surprising heat that balances sweetness. This twist adds an exciting depth, making your treats unforgettable.
- Flavored Peanut Butter: Use flavored peanut butter, such as honey or chocolate, for a unique spin on the classic recipe. Each variation brings its own charm and will impress any peanut butter lover.
- Sea Salt Sprinkle: Top with a sprinkle of flaky sea salt before the chocolate sets for a sweet-and-salty delight. This simple touch enhances flavors and makes every bite more indulgent.
- Coconut Infusion: Stir shredded coconut into the peanut butter filling for a tropical twist that brightens up the treat. The coconut adds a chewy texture and complements the rich chocolate beautifully.
- Vegan Version: Choose dairy-free chocolate chips and natural peanut butter mixed with maple syrup instead of powdered sugar. These swaps ensure everyone can enjoy this classic treat without compromising flavor.
Make Ahead Options
These delicious Homemade Peanut Butter Cups are perfect for meal prep, allowing you to indulge your sweet tooth without the last-minute rush. You can prepare the chocolate layer by melting 1 cup of dark chocolate chips in advance and spooning a small amount into each muffin tin cup to cover the bottom, which can be done up to 24 hours ahead. For the peanut butter filling, mix together 1/2 cup of creamy peanut butter, 1/4 cup of powdered sugar, and 1/2 teaspoon of vanilla extract; this can be made up to 3 days in advance and stored in the refrigerator. When you’re ready to serve, simply fill the chocolate cups with the prepared peanut butter mixture, top with any remaining melted chocolate, and refrigerate until set. Enjoy these delightful treats chilled for a satisfying dessert anytime!
Homemade Peanut Butter Cups Recipe FAQs
What type of chocolate chips should I use for the chocolate layer?
You can choose between dark chocolate chips or semi-sweet chocolate chips, depending on your preference. Dark chocolate adds a rich, deep flavor, while semi-sweet offers a slightly sweeter profile. Both melt beautifully and create a deliciously smooth base for your homemade peanut butter cups.
How should I store my homemade peanut butter cups?
Once you’ve made your peanut butter cups, keep them in an airtight container in the refrigerator. They’ll stay fresh for about one week, but trust me, they might not last that long! If you prefer them chilled, this storage method is perfect.
Can I freeze homemade peanut butter cups?
Absolutely! These delightful treats can be frozen for up to three months. Just make sure to place them in an airtight container, separating layers with parchment paper to prevent sticking. When you’re ready to enjoy them again, let them thaw in the refrigerator for a few hours.
What if my melted chocolate doesn’t smooth out properly?
If your melted chocolate is clumpy or thick, it may have been overheated. To fix this, add a teaspoon of coconut oil or vegetable shortening and stir until smooth. Make sure to melt in 30-second intervals and stir well between each to achieve that silky texture!
How do I adjust the sweetness of the peanut butter filling?
The powdered sugar in the filling can be adjusted based on your taste preferences. Start with 1/4 cup and mix well; then taste it! If you want it sweeter, gradually add more powdered sugar until you reach your desired sweetness—it’s all about customizing it to your palate.
What’s the serving size for this recipe?
This recipe yields four delightful homemade peanut butter cups. Each cup contains approximately 150 calories, making them a sweet treat that feels indulgent without overdoing it. Perfect for sharing… or keeping all to yourself!
Homemade Peanut Butter Cups
Delicious homemade peanut butter cups made with rich chocolate and creamy peanut butter, perfect for satisfying your sweet tooth.
Chocolate Layer
- 1 cup dark chocolate chips (or semi-sweet chocolate chips)
Peanut Butter Filling
- 1/2 cup creamy peanut butter
- 1/4 cup powdered sugar (adjust to taste)
- 1/2 teaspoon vanilla extract
Prepare Chocolate Layer
- Melt the dark chocolate chips in a microwave-safe bowl in 30-second intervals, stirring in between until smooth.
- Spoon a small amount of melted chocolate into the bottom of each muffin tin cup, spreading it to cover the bottom.
Make Peanut Butter Filling
- In a mixing bowl, combine the creamy peanut butter, powdered sugar, and vanilla extract. Mix until well combined.
- Spoon the peanut butter mixture on top of the chocolate layer in each muffin cup, filling them about halfway.
Top with Chocolate
- Pour the remaining melted chocolate over the peanut butter filling, ensuring it is fully covered.
- Refrigerate for at least 1 hour or until set.
Serve
- Once set, remove the peanut butter cups from the muffin tin and serve chilled.
Store any leftovers in an airtight container in the refrigerator for up to a week.


Leave a Comment